
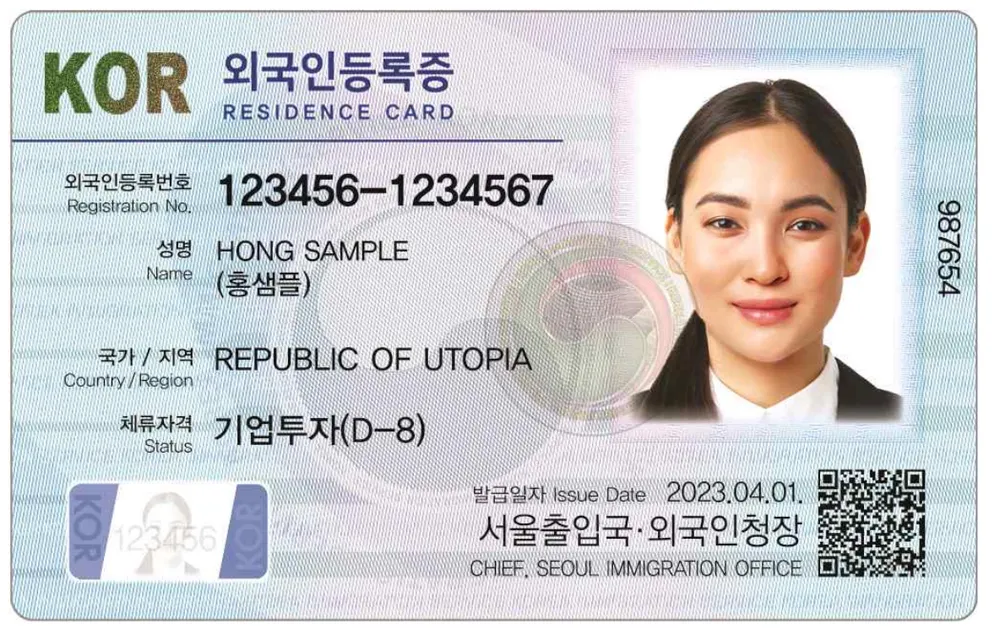
Planning to live in Korea for more than 90 days, not just visit? Then you need to apply for a Residence Card within 90 days of arriving.
Once you have one, everything from opening a bank account to choosing a phone plan to verifying your identity gets a lot easier.
But if you have no idea how to actually get one, this guide walks you through the basic steps and what to prepare.
First: understand what the Residence Card unlocks
A quick note on the name. You'll hear almost everyone call it the ARC, short for Alien Registration Card. That was its official English name until the Ministry of Justice dropped the word "alien," and cards issued since January 2021 say Residence Card instead. Same card. In Korean it has always been 외국인등록증 (oegugin deungnokjeung).
Think of the Residence Card as the key that turns on the rest of Korea:
- Bank account: most banks want it
- Postpaid phone plan: prepaid works without it, real plans usually don't
- 본인인증 (bonin injeung, identity verification): the invisible wall that blocks delivery apps, shopping sites, and banking apps until your identity is registered
- National Health Insurance, some rental contracts, and the list keeps going
This is why the Residence Card is not a "later" task. It's a week two task, because the card itself takes time to arrive.
Step 1: Know your deadline (and ignore it)
Long-term residents are required to register within 90 days of arrival.
But here's the honest advice: don't use the full window. Appointment slots at popular immigration offices fill up fast, especially in March and September when semesters start. If you wait until week ten, you may find the earliest slot is weeks away. And your card takes more time after that.
Apply in your second week. Everything else gets easier once it's done.
Step 2: Book your appointment on HiKorea
Everything starts at HiKorea (hikorea.go.kr), the official government portal for immigration services. It's available in English. A few offices may still take walk-ins, but don't plan around that. Book an appointment, always.
You'll be booking a visit to your local immigration office (출입국·외국인청 / 출입국사무소, churipguk samuso). A few things people get wrong:
- Go to the office for your registered address. Which office you visit is always decided by where you live.
- Book early in the day if you can. Morning slots mean shorter waits.
- Write down your reservation number. You'll need it at the door.
💡 Friend tip: If HiKorea shows no open slots, keep checking back. Appointments can be cancelled up until the day before a visit, and cancelled slots go back into the calendar, so refresh the booking page over a few days rather than giving up after one look.
Step 3: Prepare your documents before you go
Requirements depend on your visa type. A working holiday holder, a language student, and a company employee don't bring the same paperwork. The list also changes.
Most lists start from the same handful of things:
- The integrated application form (출입국 통합신청서): download it from HiKorea or fill it in at the office
- Your passport, plus a photocopy
- One colour photo, 3.5 × 4.5 cm, white background, taken within the last six months. Note the size. This is not the same as a US passport photo
- Proof of where you live: a lease, or if the place isn't in your name, a 숙소제공확인서 (a signed statement from whoever is housing you)
- The fee. Bring cash in case your office doesn't take cards
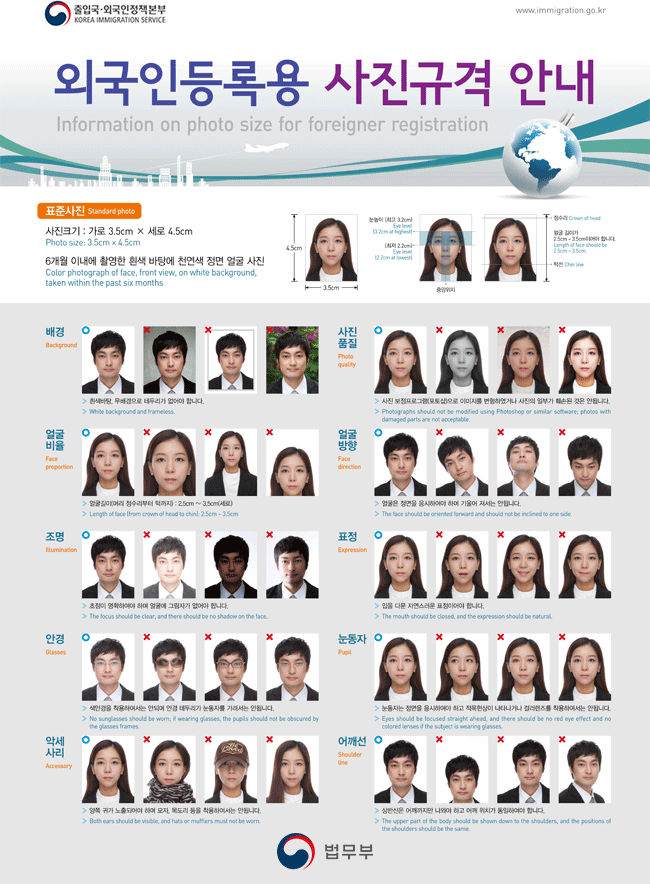
What sits on top of that is what depends on your visa: a certificate of enrolment, an employment contract, a visa issuance confirmation. That part you have to look up.
So instead of copying a list from a blog (including this one), do this:
- Go to HiKorea and find the requirements for your specific visa type
- Print or screenshot that page
- Bring more than you think you need: spare photos, spare copies, and anything you're unsure about
Bring more photos than you think you need. The photo booth near the office always has a line.
⚠️ If your school or company has an international office, ask them first. Many of them do group applications or hand you a checklist that's already correct for your situation.
Step 4: At the immigration office
What to expect:
- You'll take a number and wait. Bring something to read.
- You'll submit documents, pay a fee, and give your fingerprints. Providing biometric information is a legal part of registering, and if you're applying in person you'll do it at the counter. If your school or company filed your paperwork for you, you may be asked to come in separately just for this step.
- You may be asked questions in Korean. They're routine: your address, your school or workplace, how long you're staying.
Two phrases worth having ready:
- 외국인등록 하러 왔어요 (oegugin deungnok haleo wasseoyo) "I'm here to register as a foreign resident."
- 천천히 말씀해 주세요 (cheoncheonhi malsseum hae juseyo) "Please speak slowly."
That second one is the most useful sentence in this entire article. Nobody expects you to be fluent. They do expect you to say something.
Step 5: The waiting part
You won't leave the office with your card in hand. It's produced after your appointment and takes a few weeks, longer in busy seasons. You'll choose how to receive it: pick it up at the office yourself, or have it posted to you for an extra fee. Check HiKorea for the current processing time and postal fee.
What you can do while you wait:
- If you still don't have a Korean number, get a prepaid SIM now. Prepaid runs on your passport alone, and you'll need a number to receive anything about your card
- Ask your school or workplace what they need from you once the card arrives
- Do the things that don't require the Residence Card: transit card, groceries, finding your local pharmacy
What you should not do: sign a long-term contract you don't fully understand because someone says "you need this now." You don't. The card is coming.
Step 6: After the card arrives
The day your Residence Card shows up is the day Korea unlocks. In order:
- Bank account: bring the Residence Card and your passport
- Phone plan upgrade: switch from prepaid to a real plan
- Identity verification: once your phone number is tied to your registered identity, the apps start letting you in
And one rule that matters more than it sounds: if you move, you have 15 days to report your new address. Check HiKorea for where to file it. Your registered address is what connects you to your immigration office, your bank, and your mail.
The short version
- Register in week two, not week ten
- Book on HiKorea, go to the office for your address
- Get requirements for your visa type from the official source, not from a blog
- Bring extra 3.5 × 4.5 cm photos
- Learn 천천히 말씀해 주세요
- Get a prepaid SIM if you don't have a Korean number yet
You're not doing paperwork. You're getting the key. 화이팅! 💪
Moving to Korea soon?
We put together a free guide for you.
→ Open
Disclaimer. This article is general information, not legal or immigration advice. We are not a licensed immigration agency and we do not represent applicants or handle applications. Deadlines, fees, required documents and procedures vary by visa type and nationality, differ between immigration offices, and change without notice. Nothing here guarantees any particular outcome. Before you act, confirm the current requirements for your own case on HiKorea (hikorea.go.kr), by calling the Immigration Contact Center at 1345, or at the immigration office for your registered address. Last updated: [2026.09.27]